HDMI Display and Sound Issues

browse
Step 1: Use the correct HDMI cable for your HDMI device
Most HDTV devices have more than one HDMI input port, therefore the HDMI display's input source must be set to the same HDMI port that is connected to your computer, for example, HDMI 2 to HDMI 2.
Step 2: Select HDMI sound output as the default audio device
Select the HDMI device as the default output device. When an external sound device is not connected to the computer, the sound settings revert to your computer's speakers and headphones. When the HDMI device is connected to the computer, the sound settings change to the HDMI device. Open sound settings to ensure the correct output device is selected.
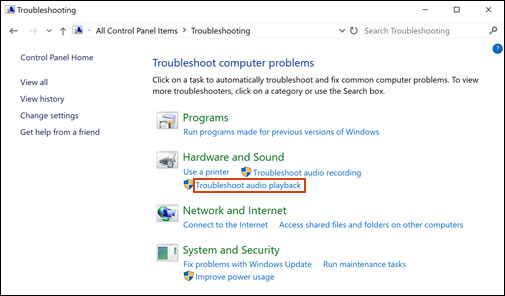
4. Under Hardware and Sound, click Troubleshoot audio playback.
NOTE:The images displayed in this document might differ from your computer, but the steps are the same.
1. Connect the HDMI cable to your computer and to your output device.
2. In Windows, search for and open Control Panel.
3. Click Sound, and then click the Playback tab.
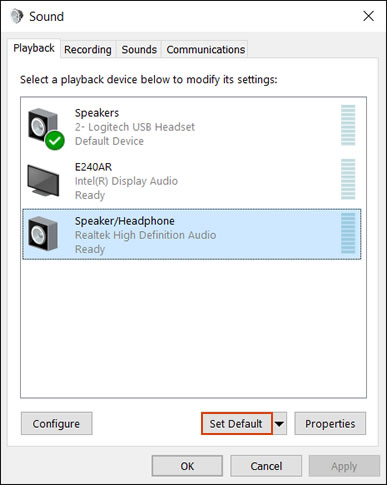
4. The Sound window opens. On the Playback tab, select Speaker/Headphone or Speakers and Headphones, and then click Set Default.
NOTE:Use Default Devices for audio output devices such as headphones or speakers. Use Default Communication Device for making and receiving phone calls.
5. Select the output device connected with the HDMI cable, and then click Set Default.
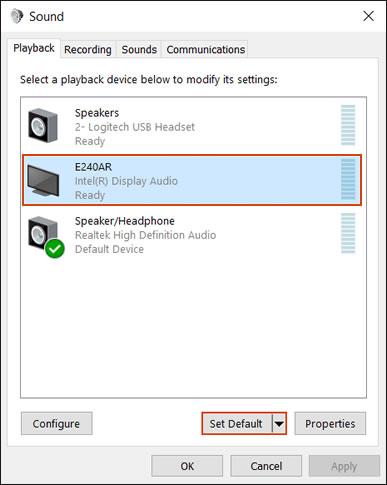
6. Right-click the output device connected with the HDMI cable, and then select Show Disconnected Devices. The HDMI cable must be connected when it is configured.
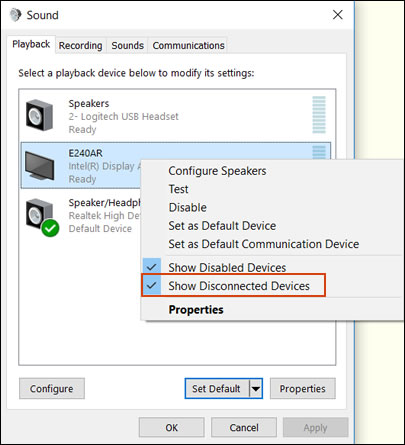
7. To view all the available sound devices, right-click any device shown in the Sound window and select the Show Disabled Device and Show Disconnected Devices options.
7. To view all the available sound devices, right-click any device shown in the Sound window and select the Show Disabled Device and Show Disconnected Devices options.
8. To view all the available sound devices, right-click any device shown in the Sound window and select the Show Disabled Device and Show Disconnected Devices options.
Step 3: Use the Windows Sound troubleshooter
1. Use the troubleshooter to resolve audio playback issues.
2. In Windows, search for and open Control Panel.
3. Click Troubleshooting.
NOTE:If you do not see Troubleshooting listed, change the View by: (Located in the upper right corner of the screen) to Large Icons.
4. Under Hardware and Sound, click Troubleshoot audio playback.
NOTE:Administrator permission is required to run this program. If prompted, type the administrator password or provide confirmation.
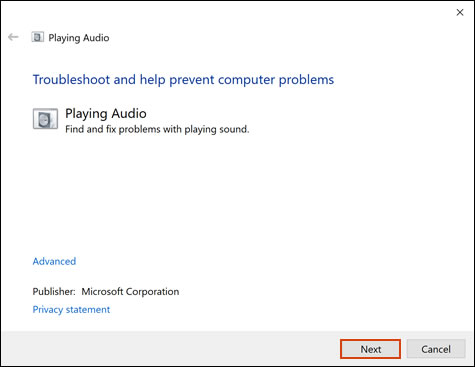
5. The Sound troubleshooter opens. Click Next. The troubleshooter begins checking the audio service status.
6. Select the device you want to troubleshoot, and then click Next. Follow the on-screen instructions and make any changes suggested by the troubleshooter. When done, close the troubleshooter.
Step 5: Check for Windows update.
1. Right-click the Windows icon.
2. Select Settings.
3. Select Update & Security.
4. If you see the Updates are available status, click Install now. Click on the updates you’d like installed, and then select Install.
Reboot your laptop and check if the audio is working. If the status shows You’re up to date,
Comments
0 comments
Article is closed for comments.